HIBA'S E-PORTFOLIO
Capstone Research

Paint-Making Process
This section of my E-portfolio follows step-by-step of my experimentory recipe that I conceptualized from the literature research I conducted, along with personal knowledge. What you'll find on this page is video and picture documentation of my paint-making process.
Experimental Recipe
-
Preparation:
-
Slice the natural materials (blueberries, beets, etc.) into small pieces.
-
or
-
Blend the natural materials and filter solids from liquids through a sieve.
-
-
Dehydration:
-
Place the sliced materials (or liquid portion of blended materials) in a dehydrator until they are thoroughly dried. Ensure they are crispy and free of moisture!
-
They can also be placed in the oven at 200° until water is evaporated.
-
-
Grinding:
-
Once dried, grind the materials into a fine powder using a blender or mortar and pestle. The finer the powder, the smoother the pigment will be.
-
-
Binder:
-
Separate egg yolks from egg whites
-
Little by little add egg yolk to pigment powder, until it reaches a thick paste consistency (dilute the mixture with water if necessary)
-
Scoop and fill plastic paint pan
-
Place paint pans in dehydrator or oven, at 110° or 120° maximum because egg yolk cooks at 150°
-
Leave to dehydrate until paint in pan becomes hardened
-
-
Storage:
-
Store the dehydrated egg tempera paint blocks in a cool, dry place.
-
-
Rehydration Process:
-
When need to use, add water to paint brush and swirl in pan
-
Proceed with painting
-
Note: this recipe is subject to change throughout the process of the experiment depending on the natural material.
Materials:
-
Natural Pigments (e.g. Beets, blackberries, spinach ect.)
-
Water
-
Cornstarch
-
Mortar and Pestle/grinder
-
Bowl
-
Parchment Paper
-
Aluminum pan
-
Oven/dehydrator
-
Sieve
-
Maks + Safety glasses
-
Spatula
-
Knife
-
Cutting board
-
Blender
Gathered Materials
Before doing my research, I made the impulsive decision to purchase a glass muller before processing what direction I would go for the project. I had assumed a glass muller was used to mix all kinds of paint (which it could). This showed how little knowledge I had when it came to painting. I assumed this was some sort of mandatory object required for the process, and I wanted to have my materials ready before beginning. When I received the item, I had realized it did not have a frosted bottom. Therefore, instead of returning it, I made the rash decision to frost the bottom myself.
I made a quick Google search on how to solve this issue myself and found that if you sand the glass, it would create the same effect. Therefore, I spent 30 minutes in my garage, grinding this glass muller (that I could easily return) back and forth on a sheet of high-grit sandpaper. I believe this was my attempt to find a solution for everything.
Regardless, now I had prepared my muller. I needed a glass slab to grind the muller on, but all the options I found online were very overpriced (thankfully, I did not make another purchase I did not need). I ended up at a glass store in Windsor and asked the employee whether any spare glass sheets were lying around. The kind worker gave me a slab for free! Even if I did not use these two materials in the process of my paint making, they are still useful for future projects!
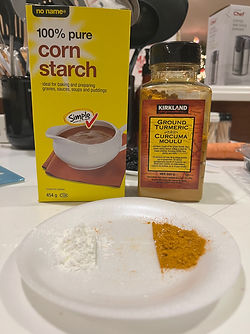
After doing my research, with my given knowledge, I was now able to pick up the proper supplies according to my paint-making process. This is the direction I should have gone with initially, haha. These items are pictured below.
.jpeg)
.jpeg)
.jpeg)
.jpeg)

Preliminary Testing
Prior to committing all my pigments and time to making these egg tempera watercolor paints, as proposed at the end of my "research process" page, I had to ensure that this plan had the potential to be successful. Before creating my pigments, for the yellow color, I had planned on utilizing turmeric; because, this pigment was already prepared without the need for the dehydration process. The same goes for the charcoal, all I had to do was grind it up, and the pigment was ready for the egg tempera step.
So, what I did was begin by separating the egg yolk from the egg white, using a trick I learned years ago from YouTube. What you do is get a clean water bottle, pinch it slightly, place the lip of the bottle on the egg yolk while still pinching the bottle. After that, release the pinch, and the egg yolk will get sucked up (refer to the video below). Super cool!
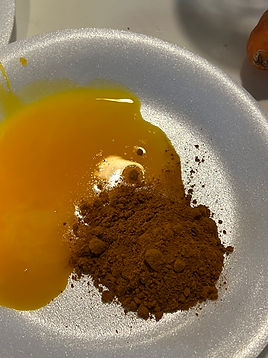
After separating the yolk, I split it in half. With each half, I mixed in a 1:1 ratio of pigment, following the guidelines of the research. However, with the turmeric, I ended up mixing enough egg yolk into the powder to make a thick paste that I could scoop into a paint pan.
After mixing the egg yolk into the charcoal and the turmeric pigment, I proceeded with the dehydration process of the recipe. I potted these mixtures into the paint pans and then placed them into the oven at a temperature of 120 ° (make sure it does not exceed 150°, so the egg yolk does not cook). Leave in the oven until the mixture becomes hard to the touch (approximately 30 minutes). Pictured below is the pans before (left) and right after dehydrating. (please ignore the mess on the tinfoil, this is the remnants of dehydrating carrots and other natural materials in the oven!)
.jpeg)
.jpeg)
.jpeg)
.jpeg)
.jpeg)
After the paint was set, I got water on my paint brush and swirled it around in the paint and thankfully the recipe worked! I was able to swatch the paint on my swatch paper (below). From here I was able to proceed with adding egg yolk to my pigments, after dehydrating.
.jpeg)
Making Red - Beets
My initial ideas on how to dehydrate and make pigment included slicing the vegetable or material of choice into very thin slices (with a peeler) and dehydrating from there (top image below paragraph). The images below show me putting carrots, crushed blackberries, and sliced beets in the dehydrator. Additionally, carrots and beets were placed in the oven. The only success with the sliced vegetables method was the carrots. However, in the after images on the right-hand side, the beets (after more than 1 hour) were still very wet after both the oven and dehydrator. I had to think of another preparation method that could quickly dehydrate the beets.
_edited_edited.jpg)
.jpeg)
.jpeg)
.jpeg)
.jpeg)
Quickly, I brainstormed and realized that I would need to make a large cracker but from beets. So, I thought about blending the beets to extract a lot of the pigment from the solids of the beets. After blending, I strained the mixture through a sieve to filter solids from liquids (left image below). However, I made a terrible mistake. After loading the smoothie texture mixture onto the parchment paper in the dehydrator, it was drying very well, but it took a long time. After the 1-hour mark, I saw some sections were still sticky and wet. I decided to speed up the process by putting the machine on bake for 3 minutes (without adjusting the temperatures, which was set to 400°). Unfortunately, this made all my work go to waste because I soon began to smell a foul burning odor. I ran quickly to the machine to find that my batch was completely burnt (image below to the right). This was my second major mistake, after the failure of dehydrating the sliced beets and crushed berries.
.jpeg)
.jpeg)
.jpeg)
Following this dilemma, I quickly began to problem solve and made another batch of blended beets. However, this time around i decided to split the batch into two dehydrating turns. So therefore each batch could quickly and evenly dehydrate, unlike the first time where there was too much product. This plan worked perfectly (images below), because the beet crackers (as I like to call it) dried perfectly and kept their vibrant red color!
.jpeg)
.jpeg)
.jpeg)
With the beet crackers dehydrated, it was now time to load up the dried beet flakes into the grinder to be transformed into powder. My favorite part was releasing the lid after grinding and seeing the smoke drift out! (video)

.jpeg)
.jpeg)
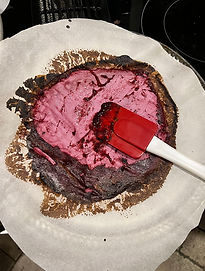
After successfully obtaining the dry pigment made out of beets, it was time for the egg tempura. With small droplets of egg yolk, I added little by little to the pigment until it became a thick paste (like the texture on the palette knife in the image below, on the left). With this paste, I transferred it into the paint pan for dehydration later on.
.jpeg)
.jpeg)
Making Orange - Carrots
The carrots were exceptionally the easiest to dehydrate. This is because no additional blending or filtering was required. All I had to do was shave the carrots with the potato peeler and place them both in the dehydrator and oven (to minimize the time spent on using the dehydrator); both machines had the same effect. They dehydrated beautifully with a nice crisp, made me also want to snack on one! The dehydrating was quite quick with only required 30 minutes to dry the carrots fully out at a temperature of 195°.
.jpeg)
.jpeg)
.jpeg)
Since the dehydrating process was very smooth, this made the grinding process satisfying. This is because the piece's of carrot have no humidity which reduced the presence of humidity and clumps while grinding. As seen in the video below, the carrots were quite powdery and dry. The image below to the very right is the amount of piment produced from the three batches above.
.jpeg)

.jpeg)
With the ready pigment, the egg tempura step came. Just as I did with the beets, I slowly kept adding egg yolk until a thick paste was formed. With this paste I compressed it into the paint pan with the palette knife, to prepare it for the next step of dehydrating.
.jpeg)
Creating Yellow - Turmeric
Before even considering the egg tempera, I had an initial idea of using cornstarch as a binder. Firstly, because a source I found while researching indicated that cornstarch had the possibility to act as a binder. Secondly, I remembered watching "My Strange Addiction" in high school and came across the story of a lady who would eat cornstarch religiously. She would create these compressed bricks of cornstarch by simply wetting the cornstarch and applying pressure to it in a box to mold its shape. I thought, since I wanted to make a watercolor paint pan, I could simply compress cornstarch and my pigment together to make a miniature brick of color (images below). I mixed a 1:1 ratio of cornstarch and turmeric, applied water to create a paste, and then I put the thick paste into an empty paint pan, letting it dry overnight. The hilarious thing about it is that it worked, and I successfully made a bullion cube of turmeric, essentially. However, once I got a wet paintbrush ready to paint with it, it all disintegrated back into its original goopy form. Hence, why I proceeded with the egg yolk as opposed to cornstarch.
.jpeg)
.jpeg)
.jpeg)
.jpeg)
Following this detour, as mentioned in the "preliminary testing" section of this page, I proceeded instead to combine the turmeric with egg yolk to make a proper water color paint pan! (pictured below)
.jpeg)
.jpeg)
Making Green - Parsley and Spinach
The process for preparing the parsley was the lengthiest one. Since parsley was a special material, it could not be dehydrated and blended because it can easily change color under the temperature of the machine. I decided to go through the same route with the parsley as I did with the beets but with a few adjustments. Since the parsley was adverse to blending by itself, it required a lot of water to get the blending going (bottom left video). I left the parsley in the blender and went to work on a few of the pigments, and when I came back, I saw the middle image below. The parsley had settled into a beautiful mosaic of green hues. This had to be captured because it truly gave BioArt vibes! Following the blending, I poured out the liquid into a sieve to separate solids from liquids (image to the right below).


.jpeg)
After separating the liquids and discarding the solids, there was so much water in the liquid portion that there was no way, I thought to myself, that this could evaporate in a timely manner. Therefore, drawing from my cooking knowledge, I opted for thickening up the liquid on the stove with some cornstarch. I quickly realized my mistake; with the heat, the color had changed into a muddy lime green (bottom right). This was not a cause for concern because the green was still intact but a different shade, which I had anticipated and left a disclaimer at the bottom of the recipe.
.jpeg)
.jpeg)

After removing the green gravy from the stove, I began applying a neat layer on a sheet of parchment paper in the dehydrator (bottom left). After approximately 1 hour (bottom middle image), the parsley chips were dry; however, some soft spots in the center looked like they required some time in the oven. Therefore, I transferred the parsley into the oven at the same temperature as the dehydrator and kept it in there for 15 minutes. The color became a richer green (bottom right).
.jpeg)
.jpeg)
.jpeg)
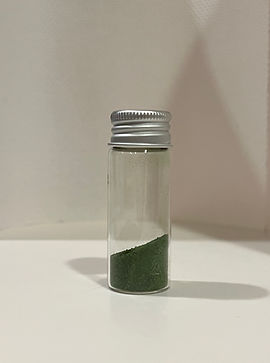
With the parsley chips dehydrated after the oven, these chips were transferred into the grinder for blending (bottom left image). The resulting amount of pigment is shown in the bottom right image.

.jpeg)
As predicted, following the pigment phase comes the egg tempera phase. Here, I again added egg yolk little by little until a thick paste was produced (bottom left). This thick paste was potted into a paint pan for dehydration later on (bottom right image).
.jpeg)
.jpeg)
Spinach
Once the pigment of the parsley was complete, I did my traditional water swatch on the swatch paper. This is where I simply mix the pigment with water to observe the color and texture of the powder. I noticed how clumpy the parsley was, and this was quite unsatisfactory to me. Therefore, I opted to try making another green with spinach since we had a fresh bag in the fridge (only used a handful of leaves).
I followed the same steps of blending the spinach; however, this time adding cornstarch to the blender to test new methods of thickening up the water that was used to blend. Instead of boiling the water out and causing the mixture to change color like the parsley, I tried a new option (bottom right image). I decided to use the large convection oven to see how the water evaporation process would work at the same 200° temperature as the dehydrator (bottom right image).
.jpeg)

After an hour in the oven, the liquid was still not fully evaporated (bottom right image). However, instead of taking it as a failure, I persisted and kept the pan in longer, and it finally reached the perfect crispy consistency that I was looking for (bottom middle image). Just as the nature of spinach, once you cook it, it shrinks. The bottom image to the very right shows the amount of pigments I got from the tray of spinach liquid.
.jpeg)
.jpeg)
.jpeg)
Following the pigment production comes the egg tempera. Egg yolk is slowly mixed into the pigment into a thick paste and is then potted in a paint pan for later dehydration.
.jpeg)
.jpeg)


Making Purple/Blue - Black Berries
This was the pigment that I struggled with the most. I made up to 4 attempts to create a blue/purple pigment; however, the outcome is just shy of a greyish purple.
The first attempt
Technically, my first attempt at making blue was the brown color in the palette made by blueberries. However, in this attempt, I began by mixing various materials: blackberries, blueberries, spinach, and some beets to try and get a purple hue if possible. While blending, the mixture was not juicing properly, so I resorted to adding more and more water each time. After using the sieve to filter the solids from the liquids, the liquid portion was too runny. I decided to pop this into the oven to evaporate as much water as possible. However, this ended badly because somehow the setting on the oven shifted to a very high temperature in the 400s, and this caused the pigment to momentarily burn. Therefore, this attempt was a fail.
Second attempt
Here I followed the same exact steps as the first attempt but I ended up burning this batch in the oven once again! :)

Third attempt
During this attempt, I deviated from using the blender to decrease the amount of water being added. Instead, I crushed blackberries using a pestle to grind the juices out of the berries (bottom left image). Following this, I used the sieve to extract all the liquid from the solid materials (bottom middle image). The berry slurry was placed on parchment paper in the dehydrator. However, once again, there was some sort of error with the way it was dehydrating because barely any product was left to grind into pigment (bottom right image). This is because the liquid turned into a sort of fruit leather that was sticky. This batch was ineffective and considered another fail.


Final (4th) attempt
This attempt was finally successful and produced the largest quantity of pigment. I stuck to the blender route and added water to the blackberries as usual. However, this time, I decided to add a good amount of cornstarch while blending to soak up the water and thicken the mixture. This proved to be a great idea because after using the sieve to filter the solids from the liquids, the liquid portion performed well in the dehydrator.
After collecting all the dehydrated flakes, it was time to put them in the grinder (bottom left video). This part is always satisfying because you get to see the smoke seep out after opening the lid! The two images next to this video show how much pigment was actually created out of this fourth attempt. This shows how worth it the effort is when you don't give up. The final image to the bottom right shows the potted pigment mixed with egg yolk. For some odd reason, the pigment lost its tone when it got mixed with the egg; however, the performance was still similar to the powder (besides the slight color change).


Making Brown - Blueberries
This color was accidentally made, as the goal was to produce a blue color. However, due to an error on my part where I applied heat to the blueberries on the stove (image below to the left), the resulting pigment color was a rusty brown. The steps to create this color began by crushing blueberries in a hot pan to extract as much pigment as possible. A sieve was then used to separate the liquid from the solids (second image below from left). The jammy solid portion was spread on parchment paper in the dehydrator (3rd image below). After approximately 1 hour in the dehydrator, there was a sticky residue on the pigment flakes. I transferred the parchment from the dehydrator to the oven at the same temperature of 195° to evaporate any remaining juices on the surface of the pigment (image below to the very right).
.jpeg)
.jpeg)
.jpeg)
.jpeg)
Following this, there was still some partial stickiness left on the pigment even after an extended period of dehydrating.
To avoid clumping up in the grinder, I added a pinch of cornstarch to prevent tackiness in the pigment (image below to the left). Once ground up (video below), the amount of pigment produced is visible below to the left.
.jpeg)


Following the pigment phase is the egg tempera step. Just like every other pigment, I slowly added egg yolk to the powder to build a thick paste. With this paste, I potted it into a paint pan for dehydration later on.
.jpeg)
.jpeg)
Making Black - Charcoal
Just as mentioned in the "preliminary testing" section of this page, the charcoal was transformed into a powder by using a grinder. After the pigment was extracted, egg yolk was mixed with the charcoal with a 1:1 ratio. The resulting paint was potted in a paint pan and dehydrated alongside the turmeric.


.jpeg)
.jpeg)
.jpeg)
The three images above are from "preliminary tests" section
The Resulting Pigments

The Final Palette

